How to Make a VHS Effect: The Short Version
A convincing VHS look is five layers on top of your footage. In any editor:
- Grade warm and slightly washed out. Lower the saturation a little, lift the blacks, and add a faint amber cast.
- Make the color bleed. Blur the color, not the detail, so colors smear a few pixels past the edges.
- Add scanlines. Thin horizontal lines at 10-15% opacity.
- Add wobble and glitches. A small, irregular sideways shimmer, and now and then a band of noise across the frame.
- Add the timestamp.
RECand a running time in a corner, in a plain monospaced font.
The rest of this page shows each step in free editors, and a preset that does all five while it renders.
Why the VHS Look Won't Die
The VHS aesthetic is everywhere: music videos, TikTok edits, indie films, product launches, Instagram reels. It reads as nostalgic, raw and personal in a world of clean 4K. But a convincing look is harder than one filter: most overlays look fake because they miss how analog video actually degraded.
What Makes Authentic VHS
- Color bleed: VHS recorded color at much lower resolution than brightness, so colors smear past edges while the picture's detail stays relatively sharp.
- Tracking wobble: the tape never tracked perfectly, so the picture shimmers sideways and jumps a little, irregularly rather than in a steady rhythm.
- Scanlines: VHS was watched on CRT TVs, with visible horizontal scan lines.
- Head-switch noise: a band of static, usually near the bottom of the frame.
- The date stamp: the
RECindicator and timestamp, usually bottom right. - Low resolution: VHS resolved roughly 240 lines of detail across the picture, far below HD.
Making It by Hand
In DaVinci Resolve (free version)
Resolve's ready-made Analog Damage effect is only in the paid Studio version. The free version can build the look by hand:
- Grade it: on the Color page, drop saturation to 60-70%, lift the shadows, and warm the image slightly.
- Bleed the color: duplicate the clip on the track above, blur the top copy a few pixels, and set its Composite Mode to Color in the Inspector. The blurred copy now supplies only the color, which smears past the edges of the sharp one below.
- Add scanlines: lay a PNG of thin horizontal lines (1-2 px lines every 4 px) over the footage at 10-15% opacity.
- Add wobble: keyframe the clip's position by a pixel or two at irregular intervals. Tedious, and hard to make feel random.
- Add the timestamp: the Text tool with a monospaced font, bottom right.
- Add grain with the built-in film grain, lightly.
Time: an hour or two per video, most of it on the wobble.
In CapCut
CapCut's Effects panel has VHS-style and retro effects: search for VHS or retro, drag one onto the timeline above your clip, and adjust its intensity. Quick, but the same few effects show up in a lot of videos, and you can't tune each ingredient separately.
With paid plugins
Plugin packs for After Effects and Premiere include VHS presets. They're good, but they cost extra, often by subscription, and only work inside the editor they're made for.
The Shortcut: The VHS Preset
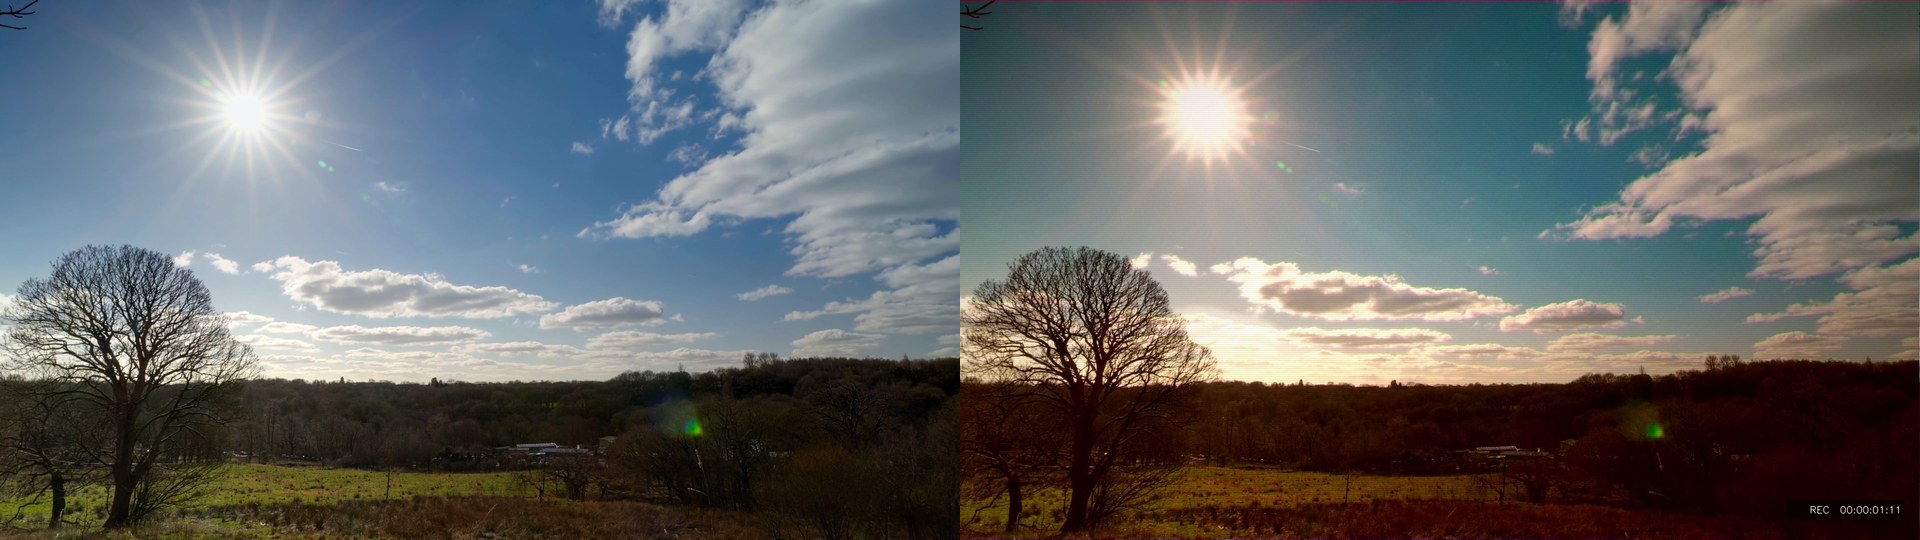
Onset Engine's VHS preset applies the whole look while it renders, to every shot, as part of a beat-synced edit of your clips. Here's the same frame rendered with the RAW preset (no effects) and with VHS:
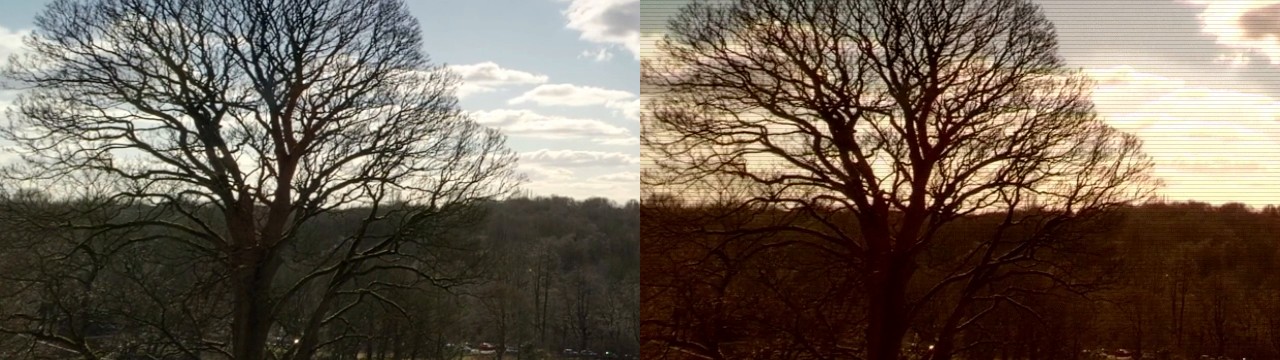
And a close-up at full size, where the scanlines and the color bleed show:
What it does:
- Color bleed: the color is offset from the picture's detail, the opposite way for red and blue, so colors fringe along edges.
- Tracking wobble: a continuous, irregular sideways shimmer with a small vertical jitter, and occasional noise bands across the frame.
- Scanlines: horizontal lines at 12% opacity, drawn into the render at the output resolution.
- REC timecode: in the bottom-right corner.
- Warm grade: a warm, filmic color grade with a faint amber cast.
No keyframing, no plugins, and it's included in the free Demo along with every other style.
When to Use Each Approach
- Build it by hand when you want a specific era of VHS, when you're mixing VHS shots with clean ones, or when you want control over every layer.
- Use a VHS preset when the whole video lives in the retro look and you'd rather spend the afternoon on the edit than on keyframes.
The VHS preset works especially well for music videos, phonk drift edits and social content. Drop in your clips, pick your track, choose VHS, render.
VHS Effect Questions
How do I make a VHS effect?
Stack five things on your footage: a warm, slightly washed-out color grade, soft color that bleeds past edges, thin horizontal scanlines, a small irregular wobble with the odd glitch band, and a REC timestamp in a corner. Any editor that has adjustment layers, a blur and a text tool can do it by hand, or a VHS preset applies all of it at once.
Can I make a VHS effect in the free version of DaVinci Resolve?
Yes, by building it yourself. Resolve's ready-made Analog Damage effect is only in the paid Studio version, but the free version has everything for the manual steps on this page: color tools, blur, composite modes, grain and the Text tool.
Does CapCut have a VHS effect?
Yes. CapCut's Effects panel includes VHS-style and retro effects: search for VHS or retro, drag one onto the timeline above your clip and adjust its intensity.
What makes a VHS effect look fake?
Usually one of two things: a single static overlay that never changes, or perfect, rhythmic movement. Real tape degrades unevenly, so the wobble and glitches should be irregular, and the color should bleed while the brightness stays fairly sharp.