Does After Effects Detect Beats?
No. The closest built-in tool is Convert Audio to Keyframes (right-click the audio layer, then Keyframe Assistant), which turns the song's loudness into keyframes on a new layer called Audio Amplitude. That's useful for things that should follow the volume, like a glow that swells with the music, but it doesn't know where the beats or bars are. For that you need markers.
Option 1: Tap the Markers In
- Import the song and drag it into your composition.
- Select the song's layer and press
Ltwice to show its waveform. - Preview with the spacebar, and press
*on the numeric keypad on every beat. With the layer selected, each press adds a layer marker without stopping the preview. With nothing selected, it adds a composition marker instead. - Zoom in and drag any marker that landed early or late onto the start of the drum hit in the waveform.
No numeric keypad? Use Layer → Add Marker, or give adding a marker a key of your own in Edit → Keyboard Shortcuts.
Tapping is fine for a 15-second piece. For a full song it's a lot of beats: 3 minutes at 120 BPM is about 360. Tapping only the first beat of each bar cuts that to a quarter.
Option 2: Run a Script That Adds Every Marker
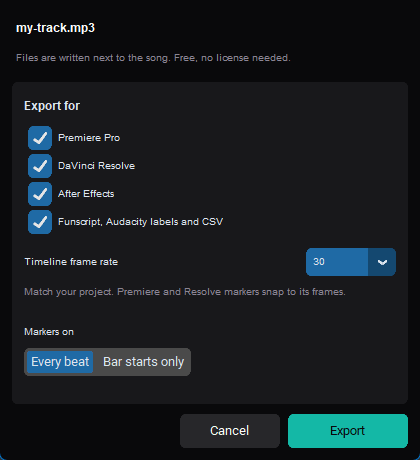
Onset Engine finds every beat and bar start in a song and writes an After Effects script that adds them all as markers. It's free in the Demo:
- Add your song in Onset Engine's AUDIO tab and click ⇩ BEATS.
- Tick After Effects and choose Every beat or Bar starts only.
- In After Effects, select the song's layer, then choose File → Scripts → Run Script File and pick the
_beats.jsxfile written next to the song.
The markers go on that layer, lined up with the song wherever the layer starts in the comp. With no layer selected, they go on the composition instead. One Undo removes them all.
Each marker is named by bar and beat: 12.3 is the third beat of bar 12, so you can read where the chorus or the drop starts right off the timeline.
Animate on Every Beat
By hand, with snapping
Hold Shift while you drag a keyframe, a layer's in or out point, or the playhead, and it snaps to markers. Jump the playhead between keyframes with J and K, and use the markers as your guide for where each hit lands.
With an expression: a pop on every marker
This expression reads the song layer's markers and makes a layer's scale pop up on each one, then settle. Alt-click the stopwatch next to Scale on a 2D layer and paste it in, replacing song.mp3 with your song layer's name:
var song = thisComp.layer("song.mp3"); // your song layer's name
var m = song.marker;
var n = 0;
if (m.numKeys > 0) {
  n = m.nearestKey(time).index;
  if (m.key(n).time > time) n--;
}
if (n == 0) {
  value;
} else {
  var t = time - m.key(n).time;  // seconds since the last beat
  var amount = 12;               // how far it pops, in percent
  var decay = 10;                // how fast it settles
  add(value, mul([amount, amount], Math.exp(-decay * t)));
}
Raise amount for a bigger pop, raise decay for a snappier one. The same idea works on other properties: add the bump to Opacity for a flash, or to Rotation for a kick. With markers only on bar starts, it pops once per bar.
Tips for Beat Markers in After Effects
- Keep markers on the song layer. Slide the song later in the comp and its markers come with it; composition markers would stay behind.
- Beats fall between frames. At 128 BPM and 30 fps a beat is 14.06 frames, so after a few bars the beat is no longer on a fixed frame count. The BPM to FPS calculator lists the exact frame of each beat.
- Precompose before you animate. Put the song and its markers in the main comp and reference them from precomps with
comp("Main").layer("song.mp3")in the expression.
After Effects Beat Marker Questions
How do I add a marker in After Effects without a numeric keypad?
Choose Layer > Add Marker with the layer selected, or assign your own key to adding a marker in Edit > Keyboard Shortcuts. Importing markers from a script also avoids the keypad entirely.
Can After Effects detect beats automatically?
No. Convert Audio to Keyframes turns a song's loudness into keyframes, which is useful for effects that follow the volume, but it doesn't find beats or bars. For beat markers you tap them in, use a plugin, or run a script that adds them.
Layer markers or composition markers?
Put beat markers on the song's layer. They move with the layer if you slide the song in time, and expressions can read them by the layer's name. Composition markers stay put at fixed times in the comp.
How do I make something happen on every beat?
Either set keyframes at each marker by hand, holding Shift as you drag so they snap to the markers, or add an expression that reads the song layer's markers, like the scale bump on this page, so every marker triggers the same animation.
Cutting a Whole Video to Music?
After Effects is great for animating on the beat, and slow for cutting a three-minute edit. Onset Engine builds the whole beat-synced edit from your own clips, matching calm shots to quiet passages and high-motion shots to the drop, and cuts on the beat. See how to edit videos to the beat without After Effects.
Onset Engine runs on Windows. The script is a plain file, so you can carry it to a Mac and run it in After Effects there too.